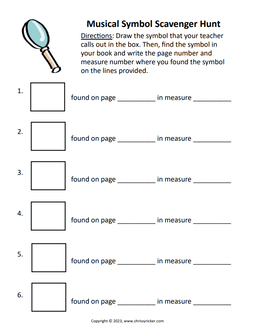
Chrissy Ricker
  • Home
  • Publications
    • Piano collections
    • Pop & rock arrangements
    • Video game arrangements
    • Vocal music
    • Instrumental music
  • Search
    • Search my catalog!
  • About
  • Blog
  • Free Stuff
  • Contact

Halloween Freebies for 2020

9/18/2020

6 Comments

 
Picture
The official start of fall is (finally!) just around the corner!

​Since I have recently updated my Free Stuff page, today I am sharing a round-up of all of the free resources I have available for the fall/Halloween season.

Looking for some spooky music? Or maybe a Halloween composing project to do this month? Read on for several free resources you can use with your students in the month ahead!


Read More
6 Comments

A Quick and Easy Ear Training Game for Online Lessons

4/29/2020

2 Comments

 
Picture

​Looking for more fun activities to spice up your online lessons? Today I am sharing a quick ear training game that has been a big hit with my students--and better yet, it requires no special  materials and no set-up time!

​Interested? Read on for more!


Read More
2 Comments

Freebie alert! "Roll the Dice" interval worksheet

1/14/2020

0 Comments

 
Picture
Do you have a hard time getting your students "on a roll" after Christmas break? I know I do!

This month I have been brainstorming ways to make practice and review in our lessons just a bit more fun. So I had a thought--how about turning some of these activities into a game using dice?

Today I am sharing a fun "roll the dice" worksheet that helps students to review intervals and draw them on the staff. Use the dice from your favorite board game, or search "google dice" and use a virtual set of dice to complete this worksheet!


Read More
0 Comments

Free Printable: "March Madness" Technique Flashcards!

3/19/2019

2 Comments

 
Picture
My students love playing flashcard-style games to drill note names and rhythms. So, I had a thought--why not create a similar game to practice technique? So, today's free printable is a set of technique flashcards with a basketball theme that you can use with students of all ages to make practicing technical movements fun! 

There are many different ways to explain technical movements to students--however, the analogy I have found most helpful for most of my students is that of a ball--bouncing, rolling, dropping, or rocking. It helps my students to make the connection between technical movements at the piano and sports--just like they do drills and warm-ups at basketball or soccer practice, drills and warm-ups are equally important at the piano.

I think drilling these movements away from the piano also helps students to focus on how each movement should feel, without having to worry about what notes are being played. You can do this movement with an imaginary ball, or a real one if you like!

Here are the technical movements introduced in each flashcard and how I teach them:

1. 
​Swing and drop. This technique helps students to practice relaxing their arm and shoulder and using their arm weight to drop onto the piano keys. How to do it: have students swing their arms to fully relax. You can check for relaxation by lifting the student's arm and gently shaking it--have them do the same to your arm so they can feel how heavy a relaxed arm is. Once the arm is relaxed, on the count of 3 drop onto the piano keys (or your lap for practice). Just like a ball being dropped, there will be a slight rebound at the bottom--this will keep students from "pushing" into the keys when they play using arm weight.

2. Bounce the ball. This is the technique I use to teach students to play with a relaxed, non-legato touch with a flexible wrist. It is also the beginnings of playing staccato. How to do it: have students pretend they are dribbling a basketball. Make sure they are moving their arm slightly and keeping their wrist flexible (you can demonstrate how silly it would look to dribble with a tense arm and wrist).

3. Roll the ball across. This technique is the foundation for legato playing, as students learn to transfer their arm weight across their hand as they play each finger. How to do it: have students pretend they are rolling a ball across the piano keys. Tell them to notice how their arm moves along with their hand as they roll.

4. Roll the ball forward. This technique helps students to lift their wrist in preparation for phrasing. It is also a good way to help make sure students are playing with a relaxed wrist and arm. How to do it: have students imagine that their hand is resting on top of a ball as they roll the ball forward. This movement should help their wrist lift naturally. It may also be helpful to imagine that they have a tiny ball on top of their hand, and as they "roll forward" and lift their wrist they are rolling the ball off the front of their hand and onto the piano keys.

5. Rock the ball. This technical movement teaches students the feeling of forearm rotation. How to do it: have students imagine that their hand is resting on top of the ball as they gently rock the ball from side to side.

Once students are comfortable with these movements, you can use these cards in different ways during your lessons. Here are a few ideas:
  • Use the flashcards game-style. Flip each one randomly and have students demonstrate the technique. Start with one or two cards and add more as students are comfortable.
  • Use the flashcards as students are playing their scales. Choose one of the first four cards and have students incorporate it into their playing of that scale.
  • String several flashcards together. For example, have a student: 1) drop the ball, 2) roll the ball across, and 3) roll the ball forward. These are the technical movements required to make a lovely legato phrase! 
  • Match up the flashcards to a student's music. Go through a piece that your student is currently learning and choose which technique might be helpful in each part of the music. For example, are there loud notes where a "drop" would be helpful? Are there staccato or legato passages that would require "bouncing" or "rolling across"? Where might a "roll forward" help to shape a phrase?

Click HERE to download your free "March Madness" technique drill flashcards!

What do you think? How do you teach technical gestures to your students? Do you have any tips to help make practicing technique fun? I would love to hear your ideas in the comments!


2 Comments

A Fun Technique Game for Your Teaching Toolbox

11/16/2018

2 Comments

 
Picture
When working with beginning students, I have three initial technical goals:
  1. Creating a relaxed, round hand shape.
  2. Playing with the correct part of the finger without collapsing the joints.
  3. Playing with a non-legato touch, using the arm and maintaining a flexible wrist.

These goals can be challenging for small hands and fingers! However, I have found a great teaching tool that is working wonders with my students—the game “Last Mouse Lost.” I discovered this game at the recommendation of another teacher on Facebook last year, and I have been incorporating it into my lessons in different ways over the past year with great success.

Although this game has official rules, I use it a bit differently--as a teaching tool for helping students to see and hear that they are landing on the correct part of their finger and to practice dropping onto each key with a bit of arm weight and a flexible wrist. It is also a great way to review finger numbers with young students. Here is what I do:
​
  • Place the game on the closed piano lid.
  • Demonstrate for students how to “pop” each row of bubbles with one finger (use fingers only—no thumb). You will use a light, bouncing motion of the arm with a flexible wrist, floating up slightly after you pop each of the bubbles.
  • Call out a finger number and ask students to “pop” a row of bubbles. Make sure students are maintaining a round, relaxed hand. If you see tension developing, stop and have students gently shake the hand to release the tension. (Or, if you are goofy like me, you can sing the Taylor Swift song “Shake it Off”!)
  • If students land on a bubble correctly, it will press all the way in with a satisfying “pop.” If students land on the wrong part of the finger, or without enough arm weight, the bubble won’t pop all the way. This is a great visual and aural reminder for students that they are doing this exercise the right way.
  • Once the student has popped all the bubbles, flip the game over and repeat with the other hand.

After we play this game, I open the piano and have my students repeat the movement on the piano keys. They should be able to hear the difference this makes in the sound—they will get a nice, fat tone because they are playing each key using their arm weight and the correct part of their fingertip. We do this game at the start of the lesson to get students thinking about how their arms, hands, and fingers should feel as they play. You can also pull the game out and do a quick refresher if you see bad habits creeping in as students are playing their pieces.

I think the best thing about this game is that it turns a rather difficult technique that can be the cause of much frustration for young students into something fun. I have even used this game as a “gentle reminder” with a few of my older students—especially those that have chronically flat fingers.

I purchased “Last Mouse Lost” on Amazon HERE, but you should also be able to find it at your local toy store or in the toy section of your local big box store.

​What do you think? Any favorite teaching tools you like to use to work on technique with your students? I’d love to hear your suggestions for making technique practice fun!

2 Comments
<<Previous

    Author

    Chrissy Ricker is a pianist, teacher, and composer from North Carolina. These are her thoughts on teaching, composing, and all things music.


    Looking for teaching ideas related to a specific topic? Use the "search" feature or scroll down to see blog posts organized by category!

    Archives

    January 2021
    December 2020
    November 2020
    October 2020
    September 2020
    August 2020
    July 2020
    June 2020
    May 2020
    April 2020
    March 2020
    February 2020
    January 2020
    December 2019
    November 2019
    October 2019
    September 2019
    August 2019
    July 2019
    June 2019
    May 2019
    April 2019
    March 2019
    February 2019
    January 2019
    December 2018
    November 2018
    October 2018
    September 2018
    August 2018
    July 2018
    June 2018
    May 2018
    April 2018
    March 2018
    February 2018
    January 2018
    December 2017
    November 2017
    October 2017
    September 2017
    August 2017
    July 2017
    June 2017
    May 2017
    April 2017
    March 2017
    February 2017
    January 2017
    December 2016
    November 2016
    October 2016
    September 2016
    August 2016
    July 2016
    June 2016

    Categories

    All
    2 Minute Teaching Tips
    Composition
    Duets
    Ear Training
    Fall/Halloween
    Free Stuff
    Friday Funny
    Games
    Group Classes
    Holiday Music
    Lesson Planning
    Living Composers
    Memorization
    Music For One Hand
    Musicianship Monthly
    NFMC Selections
    Online Lessons
    Patriotic Music
    Pop Arrangements
    Practicing
    Professional Development
    Repertoire
    Rote Teaching
    Saint Patrick's Day
    Sight Reading
    Summer
    Technique
    Technology
    Thanksgiving
    Theory
    Tips For Teens
    Transposition
    Travel Teaching
    Valentine's Day
    Young Beginners

    RSS Feed

    Subscribe to my monthly newsletter to stay informed about my latest publications and free teacher resources!

    *Your email will never be shared or used for any other purpose besides this once-monthly newsletter, and you may unsubscribe at any time by clicking "unsubscribe" at the bottom of your newsletter email or contacting me HERE through my website.

Subscribe
Copyright 2020 Chrissy Ricker. All Rights Reserved.