
Has the "pop-it" craze caught on in your studio? Learn how to use the popular fidget toy to practice technique in today's teaching tip video!
Click "read more" to watch the video!
|
|
|
Has the "pop-it" craze caught on in your studio? Learn how to use the popular fidget toy to practice technique in today's teaching tip video! Click "read more" to watch the video!
4 Comments
 The official start of fall is (finally!) just around the corner!
Since I have recently updated my Free Stuff page, today I am sharing a round-up of all of the free resources I have available for the fall/Halloween season. Looking for some spooky music? Or maybe a Halloween composing project to do this month? Read on for several free resources you can use with your students in the month ahead!  Looking for more fun activities to spice up your online lessons? Today I am sharing a quick ear training game that has been a big hit with my students--and better yet, it requires no special materials and no set-up time! Interested? Read on for more! 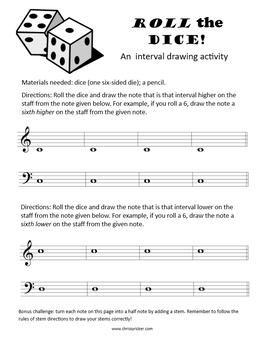 Do you have a hard time getting your students "on a roll" after Christmas break? I know I do!
This month I have been brainstorming ways to make practice and review in our lessons just a bit more fun. So I had a thought--how about turning some of these activities into a game using dice? Today I am sharing a fun "roll the dice" worksheet that helps students to review intervals and draw them on the staff. Use the dice from your favorite board game, or search "google dice" and use a virtual set of dice to complete this worksheet! 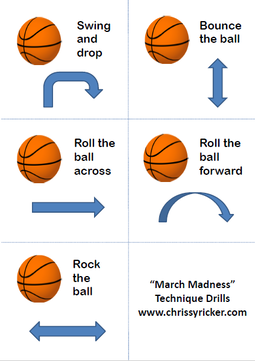 My students love playing flashcard-style games to drill note names and rhythms. So, I had a thought--why not create a similar game to practice technique? So, today's free printable is a set of technique flashcards with a basketball theme that you can use with students of all ages to make practicing technical movements fun!
There are many different ways to explain technical movements to students--however, the analogy I have found helpful for most of my students is that of a ball--bouncing, rolling, dropping, or rocking. It helps my students to make the connection between technical movements at the piano and sports--just like they do drills and warm-ups at basketball or soccer practice, drills and warm-ups are equally important at the piano. I think drilling these movements away from the piano also helps students to focus on how each movement should feel, without having to worry about what notes are being played. You can do this movement with an imaginary ball, or a real one if you like! Here are the technical movements introduced in each flashcard and how I teach them: 1. Swing and drop. This technique helps students to practice relaxing their arm and shoulder and using their arm weight to drop onto the piano keys. How to do it: have students swing their arms to fully relax. You can check for relaxation by lifting the student's arm and gently shaking it--have them do the same to your arm so they can feel how heavy a relaxed arm is. Once the arm is relaxed, on the count of 3 drop onto the piano keys (or your lap for practice). Just like a ball being dropped, there will be a slight rebound at the bottom--this will keep students from "pushing" into the keys when they play using arm weight. 2. Bounce the ball. This is the technique I use to teach students to play with a relaxed, non-legato touch with a flexible wrist. It is also the beginnings of playing staccato. How to do it: have students pretend they are dribbling a basketball. Make sure they are moving their arm slightly and keeping their wrist flexible (you can demonstrate how silly it would look to dribble with a tense arm and wrist). 3. Roll the ball across. This technique is the foundation for legato playing, as students learn to transfer their arm weight across their hand as they play each finger. How to do it: have students pretend they are rolling a ball across the piano keys. Tell them to notice how their arm moves along with their hand as they roll. 4. Roll the ball forward. This technique helps students to lift their wrist in preparation for phrasing. It is also a good way to help make sure students are playing with a relaxed wrist and arm. How to do it: have students imagine that their hand is resting on top of a ball as they roll the ball forward. This movement should help their wrist lift naturally. It may also be helpful to imagine that they have a tiny ball on top of their hand, and as they "roll forward" and lift their wrist they are rolling the ball off the front of their hand and onto the piano keys. 5. Rock the ball. This technical movement teaches students the feeling of forearm rotation. How to do it: have students imagine that their hand is resting on top of the ball as they gently rock the ball from side to side. Once students are comfortable with these movements, you can use these cards in different ways during your lessons. Here are a few ideas:
Click HERE to download your free "March Madness" technique drill flashcards! What do you think? How do you teach technical gestures to your students? Do you have any tips to help make practicing technique fun? I would love to hear your ideas in the comments! |
AuthorChrissy Ricker is a pianist, teacher, and composer from North Carolina. These are her thoughts on teaching, composing, and all things music. Looking for teaching ideas related to a specific topic? Use the "search" feature or scroll down to see blog posts organized by category!
Archives
April 2024
Categories
All
|
 RSS Feed